...Or Useful Stuff
for Spridget owners.
Looking around the web,
there seem to be a lot of "Here's my Midget" sites, many of which are great
but very few seem to deal in interesting and useful data which isn't available
from Haynes or Practical Classics. As one rusty sill looks very much like
another and most of us don't need to go further than the garage to view
a car in pieces I'll try and concentrate on the variations from standard
spec. which I've made.
Health and Safety Disclaimer:
Much of what follows contains descriptions of modifications to the car
which are non- standard and not approved by the manufacturers. While every
effort has been made to ensure accuracy and point out safety implications
on the way, it is UP TO YOU to determine whether any of this work is safe
to do and within the capabilities of the person carrying out the work.
They may also be illegal in your country or state. So don't sue us if you
end up in the ditch!...
History of
the car
More Legroom
Strengthening
and stiffening the bodyshell
Fibreglass
bonnet
'Adding
Lightness'
Suspension
mods
Gearboxes
Wheels and
Tyres
Engine mods
- normally aspirated
Supercharging
Other
modifications
Bookshelf
History
of the Car:
I bought the car in 1985
with just over 100,000 miles on it and six previous owners. A typical well
used Midget of the time it was in pretty good shape, shiny and mechanically
sound. I bought it from a specialist dealer in Guildford and paid a very
hard- saved £1750 for it- towards the top end of the market at the
time but worthwhile as it was solid, usable and reliable. - Important when
you're an 18 year old student with limited mechanical experience
using it as everyday transport.
I spent that summer of '85
just playing with my new toy. both driving it around and tinkering with
the niggly little things. I learned a huge amount just by looking and checking
things in the Haynes manual, tweaking and tightening things which were
wrongly adjusted or loose and cleaning and repainting dirty or rusty fittings.
Over the years I repaired
or replaced most things, except the engine, which was always pretty strong.
When it needed a rebuild I had the head reworked- ported, skimmed etc.
by Oselli Engineering of Oxford. I also fitted a Kent 266 cam, freer flowing
exhaust system and manifold and modified the inlet manifold and carbs to
help the airflow. (see the engine section below for more details). In 1994
I acquired a "barn state" Frogeye, which I restored and still own. I am
also on my second Jaguar XJ6 which I use most days. However I've never
felt the slightest urge to get rid of my Midget. - I love driving it too
much. In 2001 I finally started the "proper" restoration, stripping every
single nut and bolt off, getting the body dry stripped back to bare metal
and welding in new floorpans, sills etc. etc. plus various modifications
and improvements, all listed below. The car was back on the road in July
2002 (after far too long in the paint shop!) and was well worth the wait.
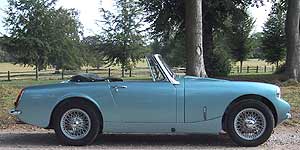
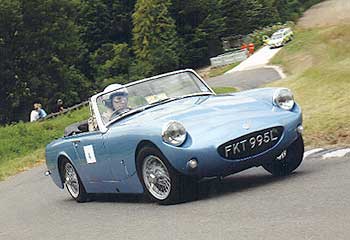
What's an "Ashley Bonneville
Replica" then?
after a truly memorable
trip to the Utah Salt Flats in 2001, (see features) I happened to
be reading John Sprinzelís book "Spritely Years" where I found a reference
to Tommy Wisdomís 1960 Alpine rally car. Supercharged and painted metallic
Ice Blue (the colour Iíd always wanted to paint mine) Sprinzelís later
called this a 'Bonneville' Sprite after the 1959 Shorrock -equipped MG
record car. Obviously this was what I was building without even knowing
it.
Modifications
for those of us who aren't midgets!
As the 6'4" John Sprinzel
said to me, "all very tall people should own one". Actually I suspect
that very few shorties own them as if you are sensitive about your small
stature you don't buy a car called "Midget", do you?
I am 6 feet 6 inches tall.
People queue up to watch me climb in and out of my car yet I am perfectly
comfortable when driving it even for long distances. I don't think I could
sleep in it (as I did once or twice as a much more flexible 19 year old!)
but I'm happy with the driving position now. I have modified things slightly
to make myself more comfortable.
Seats:
These make the biggest difference. The bucket type seats on the Frogeye
and early Midgets are the worst for the long-legged as they have very thick
cushions and the back angle isn't easily adjustable. I drive my Frogeye
with a much thinner cushion in the drivers' seat and replace it with the
original one for show only.
There have been a surprising
number of seat types fitted over the years. As all the models from MK1
through to rubber bumper have the same interior dimensions, try sitting
in different models at shows. There is a huge difference between new and
old seat foams, especially on the earliest seats.
On my car the best seats
I have found are Midget Mk 2 / early MGB ones as the backs and cushions
are the thinnest while still remaining comfortable. Raising the seat up
on wooden spacers can give you more legroom (see the note below on floorpan
mods) provided you don't then bang your head on the roof. Alternatively,
putting wedge shaped spacers under the seats tips the angle of the seat
back, giving more arm room and better thigh support. play around with wood
blocks and see what works for the shape you are.
Body modifications:The
first mod is so worthwhile I can't believe I didn't do it years ago!
I have made an approx. 2" (50mm) deep trough in the driver's footwell about
320mm square. My heels rest on this lowered floor which alters the angle
of the legs and gives a couple more inches of effective legroom, stopping
my knee from hitting the dash. The difference in comfort this makes for
the long-legged is just fantastic. Pictures and diagram below reproduced
in the interests of reducing human suffering.
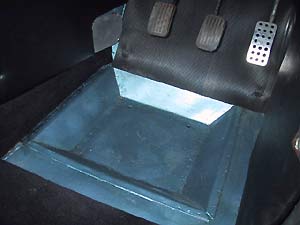 
The trough is made of 20
gauge/ 1mm steel sheet, spot welded together and then welded into a hole
cut into the floor pan. the drain holes have deflector plates welded to
the undersides so the water doesn't come back up! There is still
enough original floor on the right to enable the original throttle pedal
to be retained but I find the pendant type shown here to be more comfortable.
The 2" depth is arrived at as being about the deepest trough practical
without reducing the ground clearance. The underside of the trough is now
level with the exhaust height, so provided you can get over the speed bumps
without dinging the pipe, the floor should also be safe.
If you are long in the torso
rather than the leg you could lower the seat area in the same way.
NB: This won't work
if you have a left-hand drive car as the exhaust runs right under the floor.
I think the 1500 exhaust runs under the left side of the car too for most
of its run (I've never been underneath one to look) but check. The
only way to run a footwell trough on a LHD car would be to re- route the
pipe.
The ideal solution to the
whole legroom problem would be to move the seat further back. However the
rear bulkhead is a complex structure and vital to the car's structure,
so cutting and modifying its shape needs skill and high standards of workmanship
to retain the strength of the car. I have seen it done, on the Huffaker
racing Midget in California and can confirm it made a huge difference.
Ed Huffaker is a fellow 'bean-pole' and reckons it was worth the considerable
effort involved to get him sitting where he can control the car properly.
Moving The Controls.
The brake master cylinder
is spaced off the pedal box by about 1/4" (6mm) using thick washers (or
a spacer plate for the engineering purist). This has the effect of dropping
the position of the pedal by about 1.5" (37mm) further away from the driver.
This has no effect on the way the pedal works except that the total pedal
travel is reduced. The pedal is in the solid full on position well
before getting near the floor. If the pedal is going to within 2" of the
floor you have serious brake problems already! There is still plenty
of pedal travel for things like bleeding the brakes.
This brings the brake pedal
pad in line with the throttle which makes driving easier. My feet are far
too big to manage any serious heel-and-toeing in this car, but I can change
pedals faster and therefore drive more smoothly. Obviously I can't modify
the clutch pedal this way as the full pedal travel is needed
I've modified the throttle
pedal from the standard 'organ stop' type as my foot only touched
the top corner of it anyway. The aluminium pad is curved slightly
to allow the foot move smoothly and spaced up from the lever bar to sit
at a comfortable height. (see the picture above)
The steering wheel is about
1" smaller in diameter than the original '72 MG one. This gives me 1/2"
more knee room on both sides and makes climbing in and out easier. I would
hesitate to fit anything much smaller as the steering effort goes up surprisingly
quickly (especially on wide tyres) and makes the car feel a bit twitchy
at least until you get used to it. The standard Frogeye wheel is huge which
makes the cockpit very cramped but it makes the steering is beautifully
light and precise.
It is possible to move the
steering wheel away from you a little (as was done on some of the works
and Sprinzel rally cars) but it is already pretty close to the dash and
you soon run out of knuckle room. You need to modify the wheel boss
by machining it- difficult with any of the standard wheels as the boss
is a hollow casting but simpler if you have an aftermarket one like a moto-lita
etc. with a nice, solid boss which can be machined down. Alternatively
just fit a wheel with less "dish" to the spokes.
Moving the wheel towards
you will give extra knee room, but at the expense of elbow clearance. as
it is so close already it is unlikely to help much but if you are exceptionally
long in the leg like me it may work. you can easily experiment by spacing
the wheel away from the boss with washers and longer bolts (although be
sure to use something completely solid and safe like a properly machined
spacer ring before driving the car.
Notice
I have made no mention of altering the length of the steering column by
cutting, re-welding etc. If you have the necessary skills to do this then
go ahead if you are ABSOLUTELY confident you know what you are doing. Just
bear in mind that this is allegedly what killed Ayrton Senna, and that
was done by Formula One engineers...
Stiffening
and strengthening:
The Sprite/Midget body tub
is essentially a miniature version of a D-type Jaguar's. This made for
a very light, stiff structure by the standards of the day, and one which
stood up well as little changed in over twenty years of production.
However there are a couple of tweaks which can be done.
Firstly though. The whole
of the car's structure must be 100 per cent sound. This is a true monocoque
and almost every part is a load bearing structure. Therefore if your car
needs any welding at all, get it done absolutely right first. The ideal
method is during a full restoration, to blast clean the whole structure
and having cut out and replaced rotten areas (patches are a stopgap measure
at best and downright dangerous at worst!) then strengthen many of the
spot welded seams by mig-welding a seam along them.
Areas to strengthen by this
method are:
Sills (top and bottom edges),
edges of rear wheel arches (where they join the box sections inside the
boot and behind the seats) , rear bulkhead joints (especially around spring
hangers), the panels on the outer sides of the footwells (inside the front
wings), the rear spring mounts (inside the boot on half elliptic sprung
cars) and the front chassis rails either side of the engine.
You can beef up the front
structure by welding a piece of thick 1"x1" angle under the triangular
box sections (see picture) joining the suspension mounting area down to
the front footwell. Tim Fenna of Frontline Developments recommends this
to make the front end structure more rigid.
The front lower crossmember
is in front of the sump, -where tyre fitters always put their trolley jacks,
denting the plate underneath. As many people do, I cut this lower plate
out as it was seriously concave. Before replacing it, I added
three pieces of 1" square tube running fore and aft, inside the box so
the new plate wouldn't get bent by jacks. Drain holes in the lower surface
allow water to escape.
Spridgets generally don't
suffer from scuttle shake unless they are seriously corroded. However it
is worth adding a bracing bar of 1/2" (13mm) tubing at the centre and two
small fillets between the bonnet hinge boxes and the scuttle top. These
make the whole of the scuttle totally rigid and don't interfere with the
positions of the wiper rack or wiring etc. under the dash. Similarly, seam
welding along the back of the horizontal bulkhead joint reinforces the
spot welds and helps prevent the moisture getting in. Some early competition
cars had a welded- on tube running all along this joint.
If you are running an electric
fan and have space in front of the engine, a bracing rod can be fitted
between the front dampers or their mountings although it needs to be made
removable so you can get the engine in and out past it! A similar rod,
joining both rear wheel arches, or linking up to the rear edge of the cockpit
can also be fitted, although at some cost to boot space.
Lastly don't underestimate
the strength of the front inner wings. These tend to rot or crack at the
rear corner where they join the very tip of the sill. As the joint here
is generally fiddly to do and can involve an awkward looking lump of weld,
people tend to ignore it. However if this area isn't firmly attached to
the sill the inner arch is not triangulated and will flex about. You should
be able to stand on the inner wheelarch easily even without the mud shields
etc. in place. When they are, they form an extra line of bracing, through
the radiator uprights (and the radiator!) all round the front of the car.
Making this area strong may not do much to the car's actual stiffness but
it will feel much more solid.
Adding
Lightness:
This is quite tricky
in terms of the actual structure. If you look at race cars you will see
lots of butchery- inner wheel arches and boot floors removed, footwell
panels replaced in aluminium, fibreglass rear ends etc. etc. This is fine
for the track as the cars are running on a very smooth surface and
for small mileages. I would tread very carefully for a road going car though.
You can replace the rear wings or the whole rear end by bonding in fibreglass
parts but they will need to be much thicker and heavier than the racing
versions if you are to avoid the gel coat and paintwork cracking the first
time you go over a bumpy road.
The opening panels are another
story. Fibreglass boot lids and doors offer a decent saving in weight although
you may find it difficult to fit all the window winder mechanisms etc.
as most of these parts are sold for racing and are therefore fairly basic.
Standard bonnets can be had with all the necessary fittings and internal
bracing to bolt straight in place. The 'one piece" front ends, i.e. bonnet
plus wings offer a big saving in weight as you are replacing these panels
plus the front valance assembly too.
Fibreglass isn't easy to
work with though. Getting a good fit is difficult and with some panels
may be impossible (see the account of my restoration!) as you can't bend
it and bash it like steel. Older panels with cracked gel coats need a huge
amount of work to prevent the cracks reappearing and most of the race weight
panels will need extra layers to make them stiff enough for road use. Think
carefully just how much weight you will be saving and whether the time
and money would be better spent on another area. The majority of the weight
of the doors for example is in the quarterlight and window equipment, not
in the steel shell.
Lastly it is hard to get
a perfect paint finish on fibreglass as it flexes and is easily damaged
when rubbing down or polishing. Having said all that, every time I look
at my Ashley front end I'm sure it was worth all the considerable grief
required!
The
Fibreglass Bonnet: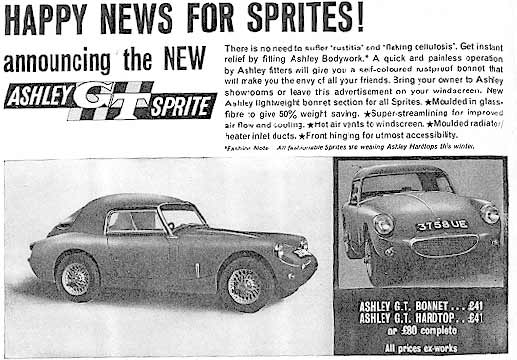
For the record- since everyone
asks, this is an early Ashley Laminates one. Made in the very early 'sixties
for the Frogeye it is obviously heavily influenced by Italian design (it
as been likened to a baby Ferrari!) and of course the Jaguar E-type. The
central rib is essentially a strengthening device, similar to the pressing
on the VW Beetle, but it looks good, and provides a raised area above the
scuttle line. There are air vent holes here, added by me but apparently
original as the period ad says they supply warm air to the screen..
The hinging arrangement
is very neat with a steel tube bonded into the structure at the front.
This takes two short tubes with brackets which bolt onto the front subframe
using the holes previously used by the bumper supports. Two V grooves
in the rear edge engage with nylon blocks in the scuttle channel to stop
it shaking. Similar nylon blocks on the sill tops hold the bottom
edges in position.
If you look at the air intake
opening you can see it was originally intended to take a Frogeye grille,
with the winged Austin Healey badge above. I left it off as the car is
schizophrenic enough already. The MG badge is from a pre-war car
(PB, TF etc,) and the grille mesh is the expanded aluminium stuff beloved
of the boy racers. The number plate letters are fixed directly to it. -
an idea pinched from the Lotus Elan. The lights are transferred straight
from the original car if a Frogeye, albeit with extra earth return wires
as the current won't find its way home through fibreglass.
The hard top isn't Ashley
as these look rather unfortunate! Although an unknown type it sets off
the front shape very well. As with the other GRP panels it has had extra
layers of glass bonded to the inside to strengthen it.
Lightening parts:
Depending how obsessive
you get (I'm second only to Rob in my habit of weighing parts all the time)
you can save a good deal of weight by attention to detail. Drilling non-
structural parts can make them 10% (or more) lighter fairly easily and
replacing things in a lighter material often helps. Aluminium is approximately
40% the density of steel and many parts can be re made or bought. Here
are some examples:
The engine backplate can
be replaced with an alloy one, available off the shelf at Moss etc., this
will save about 2.5kg (NB: this is not allowed in some classes of
racing)
Aluminium cylinder heads
are available, although fearsomely expensive and not always legal on race
cars they offer better cooling properties and replace that big ol' lump
of cast iron with something about 8 kg lighter.
I rebuilt my heater box
in aluminium. Although rather extreme in terms of the work (!) involved
this does save a bit of weight. You may find them for sale from places
like Cambridge Motorsport or Ashley Hinton.
Aluminium radiators and
fuel tanks are also available. It depends on how rich and/ or obsessed
you are.
Lightweight racing batteries
are a possibility. -expensive though. Most racers reposition the battery
lower in the car to help the handling.
Lighter road wheels have
multiple benefits as they reduce not only the overall but the unsprung
weight. The rotational inertia is also reduced, improving braking and acceleration.
Wire wheels are a little lighter than Rostyles and the hubs are smaller
and lighter too.
Side windows can be replaced
with Acrylic / Plexiglass material which is roughly half the weight. It's
generally illegal to do the windscreen though and you need to be careful
to avoid scratches.
If you dare, remove the
spare wheel entirely and carry an aerosol of "instant spare" type foam.
This is actually standard on some new cars, including Lotus though
not such a good idea for long trips. The foam may not work on wire wheels
if the inner tube gets seriously shredded.
Take a good look at what
else you carry in the boot. A well- thought out set of breakdown tools
is useful and can be fairly small. Don't
be tempted to lighten
the jack!
Uprating
the car:
Ever since the first Frogeye
came out in 1958, people have been modifying their cars to make them go
faster. The A series engine can be tuned to produce over 200bhp, with varying
degrees of reliability. First port of call is the A series Bible: "Tuning
BL's A Series Engine" by David Vizard. This covers virtually every size,
type and configuration of the engine ever built and explains in no- nonsense
terms what will and won't work. He also stresses the need to set engines
up on a rolling road. This is the one step which separates serious tuners
from the dreamers and bullsh***ers, and real horsepower from pub horsepower
( Pub hp = approx 1.5 x True hp)
Also think carefully about
what you want from the car as there are different sorts of "fast" . A
race-spec engine will produce a nice impressive number at the top of the
rev range but is likely to be off-cam and virtually undriveable in traffic.
A millder state of tune which gives a fatter torque curve at the expense
of top- end power is likely to make for faster times and a more enjoyable
car on roads rather than tracks.
Brakes:
While an uprated engine is always great, a lot of driving enjoyment can
be gained from more powerful lights, horns (!) and brakes. Halogen headlights
are a must in modern traffic, plus you can actually see things at night
when it's raining! A decent air horn (although please, not the tune-playing
variety!) gets the attention of Volvos etc. who tend to overlook
such a tiny car however fast it is approaching. Brakes are usually
mentioned alongside engine tuning with the maxim "don't start what you
can't stop" and this is absolutely right. However, really good brakes
make any car more rewarding to drive as well as reassuring for emergencies.
I have Frontline Developments' 9" Supersport disc kit on my car. This uses
great big cross-drilled discs, larger callipers and uprated (EBC greenstuff)
pads, really hauling the car down from speed in a well controlled progressive
way. Fantastic modification, highly recommended for road and track.
Suspension:
Pretty much everyone agrees
that the standard Spridget front suspension is pretty terrible. In perfect
condition it works well, but the antiquated design means that even with
regular greasing it will wear pretty rapidly. The main problem is the use
of the lever arm damper as the suspension top link. This is subject to
a lot of twisting loads (you can feel it moving under really heavy
braking) and as soon as the top trunnion bush starts to wear, so does the
lower fulcrum pin, the kingpin bushes, the inner fulcrum rubbers
etc. etc. until it fails the MOT. The Armstrong/ Girling lever arm type
damper is hardly cutting edge technology either and the internal parts
wear fairly quickly (very quickly on exchange- refurbished units) necessitating
changing, or the time-honoured bodge of adding heavier oil like EP90 to
the reservoirs.
At the risk of sounding
like 'Advertorial' for the company, Frontline's front suspension kit is
truly excellent. The top damper is replaced with a fabricated upper wishbone
assembly which resists the twisting motion of the kingpin far better. A
Koni telescopic damper is fitted, which is adjustable for rate. The coil
spring, wishbone and kingpin assembly are all retained but these have a
much easier life now they are held in position by the new top wishbone.
I also fit 'Superflex' Polyurethane
bushes to the inner fulcrum pins and top trunnion bushes. Other brands
are available and possibly cheaper but check two things: Don't buy any
bushes with bubbles or holes in the material (inferior quality) and check
the metal sleeves used are stainless. Mild steel bushes rust solid to the
fulcrum pins, making their removal one of the all-time nightmare jobs.
Polyurethane is better than
the original rubber because it "tightens up" the feel of the suspension
steering without transmitting lots of vibration. It doesn't soften with
age like rubber or wear quickly like the Nylon /Nylatron stuff we used
to use.
An alternative to the Frontline
kit is to modify the damper so it has a longer pivot shaft and a second
arm coming from the body, rather like an MGB damper. This is the method
favoured by racers for years, especially in classes which demand the use
of the original dampers. Another method is a rose-jointed connecting
link from a bracket on the body to the top trunnion, which works well but
requires very careful positioning to retain the proper suspension geometry.
Front anti-roll bars:
If your car hasn't got one, go out and buy one immediately! it will make
probably the biggest single difference to the handling and feel of the
car, it is relatively cheap and you can fit it inside an hour without dismantling
anything. The idea is to pull down the unloaded inside wheel in a
corner, keeping it in contact with the track and increasing front end grip.
Anti roll bars come in a
number of different thicknesses. The standard one fitted as a factory option
is 9/16" . Uprated ones of 5/8" and 11/16" are available from the likes
of Moss, all of which are suitable for road use. Competition cars can go
up to 3/4" or even 7/8" but this would be too much for a road car,
increasing the understeer instead of reducing it.
The bar mounts in
a pair of blocks, rubber as standard, neoprene for uprated. Competition
cars run solid aluminium mountings which make the bar effectively stiffer
but they are dreadfully noisy and counter-productive on normal bumpy roads.
Increasing the amount of
negative
camber to 2 degrees neg. helps the turn-in on road cars (this amount
is designed-in to the Frontline kit) without making it too 'darty' or nervous.
Adjustable offset trunnions are available which allow you to play with
varying amounts.
Rear suspension:
The standard setup uses
leaf springs and a solid "live" axle, the problem being that the axle is
avery heavy piece of unsprung weight, located only by the springs. In cornering,
the body tries to move laterally over the axle, while rolling due to the
weight transfer to the outside of the bend. The springs tend to twist,
allowing the body to move laterally, but they also alter in length as they
bend, causing the axle to move out of alignment. All of this is A Bad Thing
as far as handling is concerned as the back end of the car is trying to
steer and the movement of the axle sideways upsets the geometry of the
car. What is required is an axle which moves freely up and down in relation
to the body but not from side to side. It should also remain square to
the body, i.e. not trying to steer the back end of the car.
Early cars with quarter
-elliptic springs have better sideways axle location as the short springs
are very thick, resisting the twisting force and holding the axle in line
fairly well. They also have radius arms which further control the location.
However, the very short, multi- leafed springs have a lot of internal friction
and a small radius of travel resulting a rather bumpy ride and less than
subtle control.
The later cars' half-elliptics
improve the ride with slightly smoother control of the axle. However,
they twist much more and change in length as they bend, allowing the axle
to move sideways and steer more. The absence of radius arms doesn't help
either.
Remedies:
Much of the unwanted motion
can be removed by improving the bushes which locate the springs but first
check all the mounting hardware is secure. I once worked on a car
with an undersized bolt replacing one of the rear shackle pins, allowing
the spring to move ever so slightly sideways. The poor car shimmied along
like a nervous duck and actually swapped motorway lanes under hard braking.
Lethal...
Fit polyurethane bushes
to the rear spring shackles and the U-bolt locating pads. I have been unable
so
far to find a poly replacement for the 'Metalastik' bush which goes in
the front spring eye but so long as the standard one and its pivot bolt
are in perfect condition they should be OK.
Frontline (yes, them again)
do a very simple conversion which replaces the lever arm dampers with adjustable
telescopic ones. This controls the axle motion better and is more comfortable.
They have also developed their r "RTL" or rear Traction Link which is a
very clever double-Watts linkage device which prevents sideways axle movement
and lowers the rear roll centre by an adjustable amount. Result, more grip
and less tendency to snap oversteer on the limit.
A word about spring
and damper adjustment. The basic set up for the road should
be "Stiff at the Front, Soft at the Back". I experiment at track
days with different damper settings. By progressively firming up
the rear shocks I made the car understeer a little less (by increasing
the tendency to oversteer) until I over did it. - I knew I'd over done
it when I spun! - That was the limit for a smooth, fast track where
the suspension can be set much harder. Keep the rear nice and soft for
the road or you'll spin out on the first bumpy roundabout.
Wheels
and Tyres: Unless you are building an out-and-out
racer don't go too mad on big wide wheels and tyres. The fact is that
the original designers did know what they were doing when they specified
the standard sizes. Big changes to the diameter or width will affect the
suspension geometry and apart from looking a bit silly on a Spridget, mega-wheels
can also put a huge strain on things like wheel studs and bearings. Make
sure you know what you are doing!
165 x 13 tyres are about
the widest that will go onto most standard wheels meant for 145s although
check with your local specialist if you are in any doubt. Remember
to order 165s in 70 profile (145s are 80 profile) so the tyre diameter
stays the same, or you will have a "Bigfoot" Spridget and seriously muck
up the handling.
Tyre makes are a matter
of preference, although DON'T buy remoulds, budget brand tyres or anything
with a lower speed rating than required for your state of tune.
I have had various things
over the years and my favourite are Michelins - very good dry grip with
a nice progressive breakaway and excellent in the wet.
Tyre
Pressures.
The factory
manual states 22 psi front 24 psi rear for 145/80 section radials.
By all means try increasing
these pressures but don't just assume that 'more is better'
. After all, the factory would have specified higher pressures if the car
performed better on them, wouldn't it ? . The only argument against this
is that modern tyre compounds are very different from those available in
1958, or even 1980 so experimenting with a few psi may pay dividends.
For the record, when I ran 145s I used to run them at 24 psi front /26
psi rear.
Wider tyres are a lot more
difficult. I have found very little information or consensus on what pressures
to run for my 165/70s. I tried 24 psi front /26 psi rear and my (lightened)
car hopped about like a ping pong ball! At present I am running 23
psi front /25 psi rear which is much better although I am continuing to
experiment. It does illustrate how sensitive these cars are to tyre pressures.
Gearboxes:
The early so-called '"smooth
case" 'boxes are a bit dodgy. They use baulk-ring synchromesh which wears
rapidly and doesn't result in the nicest changes even when perfect. Many
of the parts are unobtainable so if yours needs major bits in overhaul
you may be in trouble. A much better bet is the later box which has a ribbed
case and much better synchro rings. A well- maintained one is an absolute
delight to use. The problem comes when you increase the engine's power.
Anything much above 80bhp and unless your gearbox is really perfect, it
will start to complain. Reconditioned ones aren't necessarily good enough
- I'd rather go to a specialist with a really good reputation and get them
to rebuild my 'box or do it myself, rather than swap it for one done by
a reconditioner.
I got fed up with my car
spitting out reconditioned 'boxes and anticipating huge amounts of lovely
torque from the supercharger (soon,...soon...) decided to put another make
of box in. This would be much stronger plus having the benefit of FIVE
Speeds.
The basic choice is between
a Toyota (Supra?) gearbox and a Ford Type 9 (or N) Sierra one. The
Toyota box is apparently very good and smooth but the problem is in finding
one as they have all been snapped up by kit car builders and MG modifiers
etc.! This, plus I knew I'd never live down the ribbing I'd get given my
views on Japanese cars :-) meant I decided on a Ford unit.
The advantage is that the
Ford Sierra box is fairly easy to find, although stocks are diminishing
as everyone else has switched to using them. A scrapyard one with a couple
of months guarantee should cost around £50-60. The bellhousing unbolts
in a couple of minutes and you are left with a reasonably neat and
small transmission unit. The gear ratios are identical except first
which is very slightly lower, plus a lovely long- legged fifth which makes
very high speed motorway cruising a pleasure.
Now all which is needed
is a conversion kit.
Frontline (yes, I know,
I really should get a T shirt or something for all these plugs but I keep
buying their stuff because it works!) do a kit which consists of an alloy
bellhousing which fits the standard engine backplate and bolts straight
on, and a modified propshaft to cope with the different size and position
of the output shaft. Also included in the kit are a suitable clutch plate
(different splines on the Ford input shaft) available in normal or extra
large size, a rear mounting/crossmember piece and a new speedo cable which
is over 6 feet long!
The mounting plate is needed
because to make the thing fit you have to cut out the chunk of centre cross
member which goes through the transmission tunnel to give enough clearance.
As just removing this would weaken the car, a replacement bridging piece
bolts on below the floor line to restore the rigidity. This is the only
part of the kit I an not 100% happy with as it doesn't really look strong
enough. I boxed mine in with additional plates and added two more bracing
bolts to be on the safe side. With a little ingenuity you could weld it
in but Frontline's Tim Fenna assures me there is no need.
The mammoth speedo cable
exits the side of the gearbox, comes through a hole drilled in the tunnel
and then runs inside the car, under the front of the drivers' seat and
up behind the trim panel in the footwell before turning back towards the
speedo head. Once installed this is actually much neater than it
sounds but you do need to route the cable smoothly. You also have to have
the speedo re-calibrated which is a nasty sting in the tail as it isn't
mentioned particularly prominently in the Frontline literature. Frontline
will handle this or it is £60 from Speedograph Richfield (recommended
as they rebuilt my whole unit and recalibrated it in less than a week)
The other major mod required
is cutting a hole about 3.5 inches square in the transmission tunnel, just
behind the original gearlever hole. The fact that the lever sits further
back can be compensated by bending the Sierra lever forwards so the gearknob
top sits exactly where it used to. If you pick up a Sierra gear lever with
the 'box it it is fairly straightforward to modify it to fit the car- you
can cut it to any length you like and then re- thread the top to take the
knob of your choice or simply Araldite it on. Alternatively you can buy
a ready- modified one with the kit.
"Quickshift" kits for this
box are very simple. Demon Tweeks sell a set of spacing pieces which alter
the pivot point of the lever giving a shorter throw. I recommend using
the car a bit first though, until you get used to the gate pattern.
So what's it like?
The gearchange is very good indeed -almost but maybe not quite as good
as a really nice crisp MG/ Morris 'box. It is however, a great improvement
to have synchromesh on first, and the fifth gear is just lovely. 70 mph
equals about 2750 rpm which makes the motorway a much less hectic place!
Plus it means the car is potentially geared for up to about 150mph+ if
the engine can manage it!
The gearbox does get quite
hot - it is important to use the right 75/90 semi synthetic oil.
Filling it is a pain as the filler/ level plug is on the side and you need
some sort of funnel / tube device to get it in. Emptying is impossible!
Ford, in their wisdom provide no drain plug of any kind. You are
supposed to remove the gearbox from the car while keeping it upright and
level (yeah, right..) then tip the oil out of the top after removing
the cover.
Not being prepared to put
up with this, I drilled a hole in the cast iron casing at the lowest point
(there's a removable bits magnet inside here so line up with the hollow
centre of that) and fitting a drain plug, lock wired for safety.
Similarly, I put another filler hole/ plug in the top cover. This is reached
by removing the battery to reveal an access hole in the battery tray shelf
directly above the filler. Access is great with a forward hinging
bonnet - a bit more fiddly with the standard set up but still much easier
than using the side filler. The oil is expensive, viscous and really evil-smelling
, all of which mean it's certain to be spilled!
I would recommend replacing
both the front and rear oil seals on a secondhand 'box as you don't
want to find out that they leak and you have to take the engine out again
to change them!
While on the subject of transmission,
the half-shafts in the rear
axle are susceptible to breaking under fierce acceleration. This affects
all cars, even those with standard engines as a bumpy road surface can
cause the axle to hop , putting big shock loads through the shafts. Power
take-offs, wheel spin starts and other such hooligan antics are fun but
you risk breaking the shafts. They invariably break at the splined end,
leaving you with the unenviable task of extracting the broken bit from
the diff.
NB: this is also a reason
why you can't use wire wheel half shafts in an axle meant for steel wheels.
The shafts are shorter so they don't fit fully into the splines in the
diff. Thus while the conversion seems to work, the first time you really
put the power down they pop out or break...
There are two answers to
the problem, either buy competition-grade half shafts which are stronger,
or have your standard ones turned down in a lathe so they are the same
thickness as the radius of the spline grooves. The reason for this apparent
anomaly is that it allows the shaft to twist slightly under load along
its whole length rather than shearing off at the weak point (the start
of the splines).
Engine:
The best thing to do if
you want to modify your standard A series engine is to buy David Vizard's
book "Tuning BL's A Series engine" which is the absolute bible on the subject.
If you have a 1500 then I'm afraid I can't help you as I know almost nothing
about these engines. - Triumph Spitfire people are the ones to talk to.
Similarly, I won't go into
detail of engine swaps such as the Fiat Twin-Cam and Rover K-series. There
are plenty of specialists around who cover these conversions, and in terms
of power-per pound they are a great way to go. However if you like to have
at least a vaguely correct engine under the bonnet then stick with the
A.
Bolt-on modifications:
Starting with the easiest
in terms of mechanical complexity:
Better Air filters.
If you are still using the standard "saucepan" air cleaners then throw
them away and fit a proper pair of K&Ns or similar. NB: DON'T buy those
shiny "pancake" chrome air filters which are an inch thick or less, however
nice they look. They are worse than the standard items! Fit ram pipes
(sometimes called stub stacks) inside the filters to improve the air flow
further. A decent tuner/ parts dealer will also sell you suitable carb
needles and springs to match the increased air flow.
Bigger carbs. - either
twin HS4's (Like an MGB) or a Weber . A single HIF6 or HS6 SU can also
be used. All will need suitable manifolds.
You can improve the standard
inlet manifold with just a bit of amateur porting as it is a pretty terrible
design. Smooth out the corners around which the air flows, particularly
the 'balance pipe' between the two main pipes as this flows a lot more
air than you'd think. You don't need (or want) mirror -smooth surfaces
everywhere, but there must be no steps at the joints with the other components.
Similarly, an SU carb. can
be improved by slimming down the thickness of the throttle spindle and
cutting off the ends of the throttle plate securing screws as they project
into the air flow. Be sure to secure them properly with thread locking
fluid so the engine doesn't swallow them! Also, radius off the leading
edge of the dashpot piston where it protrudes into the carb bore on full
lift to sharpen up the throttle response. - It is all in the Vizard book.
Weber 40 / 45 settings.
Although the Vintagent in
me prefers the prehistoric SU, The Weber 45 is pretty much the standard
carb used by racers. For roadgoing applications though a 40 is fine.
See Vizard for full chapter and verse on these but the following settings
are quoted by Moss in their Special Tuning Manual:
Road setting. Weber 40DCOE
30mm Choke
120 Main Jet
45 Aux Vent
F16 Emulsion Tube
155 Air Jet
35 Pump
40F8 Idler Jet
This is what is fitted to
Andrew's green 1275 car (see garage page) so
we know it works. It pulls as well if not better from all speeds. Significantly
better than the standard twin SUs, especially on low-speed pickup. Sounds
good too!
Fast Road setting. Weber
40DCOE
32mm Choke
145 Main Jet
45 Aux Vent
F16 Emulsion Tube
180 Air Jet
40/45 Pump
50F8 Idler Jet
This I have no direct experience
of, but I would guess loses some low revs tractability. You'll need
a hotter cam and/or high lift rockers to exploit the difference, otherwise
I doubt it will do any more than the Road setting except burn fuel.
Race setting Weber 45DCOE
40mm Choke
190 Main Jet
45 Aux Vent
F2 Emulsion Tube
170 Air Jet
60 Pump
50F6 Idler Jet
This is Moss recommendation
and will, of course be a starting point as any race engine will have to
be sorted out on a rolling road to optimise it for all the other variables
in cam, ignition, exhaust etc.
Lightening the flywheel.
This doesn't actually increase the engine power at all but it does have
a marked effect on acceleration as the engine first has to accelerate the
mass of the flywheel before doing useful work on the transmission.
the work is best left to specialists who will balance the flywheel properly
and will know how much weight to remove. Overdo it and the tickover will
be horribly lumpy or worse, the flywheel could break, with lethal consequences.
High ratio rockers can be
exchanged for the standard items without removing the head. These improve
the breathing by making the valves open further but take care! If they
open too far they will hit the pistons (BIG bang!) so make sure there is
clearance. - if you suspect your engine is non standard compression (skimmed
head or altered pistons) then proceed with caution. High lift rockers can
also change the effective cam timing as the valves will be opening at faster
rates. Seek professional advice if not sure.
If you are rebuilding the
engine then the first thing to improve is the cylinder head. If you need
to have valve seat inserts put in for unleaded fuel then consider exchanging
the head for a modified one. The ports and combustion chamber shapes are
changed (see the Vizard book!) and bigger/ better valves can be put in.
The head is the key to the way the engine 'breathes' and hence to horsepower.
The truly dedicated modify their own heads while I'm happy to use the services
of professionals who have all the necessary equipment, experience and skill.
Any decent engineering firm
can "skim" the head for you. This involves machining metal off the flat
lower surface which raises the compression ratio. Standard CR is usually
around 8 to 1 or less. The engine will take at least 9 to 1 (mine ran 9.75
to 1 before the supercharger was fitted) and should not 'pink' on standard
fuel, although 10 to 1 would be the real limit for ordinary pump fuel.
NB: If you have problems
with pinking and retarding the ignition doesn't help. Shell Optimax is
the highest octane (98) unleaded widely available in the UK- or you can
use an octane booster type additive.
The Camshaft is the 'brain'
of the engine. It controls the timing of the valves and hence the power
characteristics. There are lots of different profiles available from tuning
companies but remember they are all a compromise between low end
torque and top end power. A full race cam will have lots of valve lift
and big overlap periods to generate lots of lovely BHP at high revs. however,
those same qualities will mean the engine will be pretty gutless at
lower speeds. - indeed many race engines will barely run below 3000 rpm
and spit and run rough until they come "On cam" at truly high speeds. Oh,
- and only a plonker thinks they can tell how "hot" a cam is by looking
at the shape of the lobes. Use the timing information supplied like
all real engineers do.
For more information try
Companies like Moss etc. who sell tuning bits but don't forget that Minis
use A series engines too, and the Mini world is teeming with extremely
clever tuners. For example, Minispares in north London have a catalogue
full of trick heads, clever carbs etc. which can all be used on a Spridget.
Also try Mini web sites, discussion groups etc.
Supercharging.
An easy bolt-on way to lots
of extra horsepower. - WRONG! - If you just want to go fast, put
a Rover K Series or Fiat Twin-Cam in. They require lots of cutting the
car about, plus numerous modifications to make everything fit and work.
However, supercharging is, if anything more complex still!
There is no really logical
reason to go to a supercharger, but then when did logic ever have anything
to do with classic car ownership? :-) There is a historical precedent
in that many early cars were supercharged - (see John Sprinzel's excellent
"Spritely Years" for example.) Shorrock blower kits, often sold by Allards
were available for many late 'fifties/ early 'sixties cars and home built
specials using military surplus exotica like aircraft cabin blowers were
also popular. The effect of forced induction on a small capacity engine
like a 948cc Sprite's was dramatic, giving huge increases in power and
especially torque for relatively little work.
More recent versions of
the A series are more efficient so the effect of the blower is not so marked.
As a rule of thumb supercharging a mildly tuned 1275 won't result in enormous
amounts of extra power, on the dyno but the torque increase will still
be very noticeable. The usable rev range is widened, making
the car more driveable and giving the appearance of a llot more power.
This is where belt driven superchargers score over turbos. - you don't
have to spool them up before they start to deliver. In Alan Allard's book
"turbocharging and Supercharging" he makes this point well: " Despite
what the theoretical engineers and pro-turbocharger lobby may say, in sheer
'get up and go' and general all-round performance on the road, as opposed
to the drawing board the supercharged engine compares very favourably with
the turbocharged one."
Be warned (again) though.
This is NOT a cheap exercise! Unless you are very lucky indeed and find
a complete kit for a bargain price, it will cost a huge amount in
time and money if you are going to do it right and get the thing to actually
work!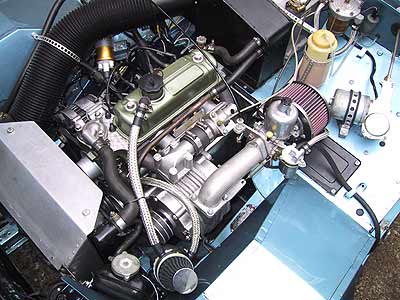
Anyway, before going down
this road, First Catch Your Blower Kit. - Shorrock, Judson or Zoller
blowers turn up at autojumbles from time to time, but a word of caution.
It is very hard to ascertain the condition of the compressor without stripping
it down and rebuild costs are very high. I bought mine knowing it was in
desperate but still saveable condition for £150. It cost me £850
to have it rebuilt making a cool £1000 on the blower alone. Yes,
this is a huge sum but you can easily pay £500 for a blower which
turns out to need just as much work!
The manifolds and pulleys
are the most difficult part. If you find a complete kit with all the pipework
etc. buy it. - Do your research so you know what all the bits look like
and what can be adapted if necessary. The trouble is that the manifolding
is designed to fit a particular application and tends to get lost in garage
clearouts etc. You can easily spend £200 on a manifold, plus if you
have to get pulleys etc. made the bill can quickly get into more hundreds.
For the record, there are
two basic inlet manifold designs for the A series engine, A short- intake
one for the small capacity engine and one with longer, curved pipes for
the bigger engines. The difference is there to allow clearance for the
exhaust manifold. I have an early type (it was all I could find) which
wouldn't clear my long centre branch tubular steel exhaust manifold.
I opted to have the exhaust manifold modified to clear the inlet as it
is easier to do, but it required some very skilled fabrication and welding
which cost another small fortune!
The blower is driven off
a triple -V crankshaft pulley which replaces the standard single-V one.
The two extra Vs take a pair of identical belts which drive the supercharger.
If you can't find one of
these you can have one made (fairly involved piece of lathe work - cost
around £150) or you can try and find a US-spec engine. These have
a triple pulley as standard; the extra belts being for the smog-control
air pump equipment and they bolt straight on. The diameter is almost
the same. - adjust the blower pulley size to maintain the ratio if need
be.
Just to give a flavour of
the scale of the work involved here is a list of things which I have
modified, moved or redesigned and built from scratch:
Centre main bearing strap.
- The bearing cap needs to be removed and machined off flat. The strengthening
strap is a piece of steel which should be lapped flat against the
bearing cap so it makes perfect contact all over for maximum strength.
Then you need two new retaining bolts which are long enough to take the
extra width of the strap.
11-stud head. - If
you are using a Cooper S or aftermarket head it will almost certainly have
11 stud holes. The standard Midget one has only nine and will need accurate
drilling for the extra two. The standard Midget block will then need to
be drilled and tapped to take the new end studs (try not to break into
the waterway at the front)
The rocker cover and its
gasket will need to be relieved to clear the new stud nuts when installed.
Exhaust manifold. In
order to get the tubular steel, long centre branch performance exhaust
manifold to fit, it needed extensive modifications to the front and centre
pipes. I just managed to cut , tweak and reposition the front pipe but
the centre branch was beyond my talents. my local race preparation shop
Barwell Motorsport fabricated a beautiful TIG welded section which cost
an arm and a leg but works! Of course you could just use a standard
cast iron manifold which clears everything with no problems but that would
rather defeat the object of tuning the engine. Supercharged engines need
as free-flowing an exhaust system as they can get..
Front bracket. This supports
the blower and needs to be accurately made to ensure perfect alignment.
The blower is also supported at the rear from a lug on the inlet manifold
and it is worth getting this positioned right so the blower outlet and
manifold adaptor ports line up as perfectly as possible. That done, the
front bracket can be made, together with two spacers which get it to stand
off the timing cover by the correct distance so the pulleys line up. Ensure
also that the bracket holds the supercharger square to the engine block
or it will throw the belts.
Carburettor bracket. - not
an original part but well worth fitting as it helps support the considerable
weight of the blower assembly as well as the carb itself. A piece of tube,
flattened at each end runs from one of the carb fixing bolts down to one
on the gearbox bellhousing.
Belt tensioner. This was
designed and made using a double V pulley as a jockey wheel on a moving
plate attached to the front bracket.
Carburettor. Original specs
call for an SU type H4 to be used. However as these are rare, expensive
and are technically inferior to the later models I used an HS4C,
This had to be fitted with
an adaptor plate for the manifold (as the bolt centres are different) which
also carries the throttle cable bracket. The Jet is specific to this model
and no 100 thou sizes are available so it had to be reamed out from the
0.090" standard. A brass collar had to be made up with a tiny grub screw
to allow the right type of needles to be used in place of the normal spring
biased long needle setup.
Heat shielding. The blower
runs VERY close to the exhaust which is pretty much unavoidable. Custom
made stainless shields placed between the exhaust pipework and the blower
and its manifold. You can use glassfibre wrap, but it retains moisture
and will rot a mild steel pipe very quickly.
Boost gauge. There should
be a suitable tapping in the manifolding between blower and head. A suitably
threaded plug links a small bore tube off to the boost gauge. all connections
need to be airtight.
Big clutch. Needed for the
big increase in torque, this caused clearance problems with the standard
starter motor as the pinion would rub on the clutch cover (it's as big
as possible so it is right out almost to the ring gear) and sometimes jam.
Rather than relieve the cover or pinion I put in a reduction geared starter
motor where the pinion engages from the front.
Distributor. The Shorrock
kit instructions require a limiting bush to be made fitting over the advance
weight peg to restrict the amount of total mechanical advance. In practice,
on the rolling road we found that this seriously restricted the power produced
and the standard distributor was much better. The advance springs need
to be modified however, to give an ideal curve. This work is still ongoing.
Spark plugs. The aluminium
head I'm using takes 12mm motorcycle type plugs. NGK's excellent web site
led me to the right spec modern equivalent of the Champion N3/N5 quoted
by Shorrock. However, they are resistor-type ones, so off with the resistive
leads and on with straight copper cores ones. Now I still need the smaller
plug boots to fit.
Other modifications.
Engine Steady Bar. This will be familiar to Mini Cooper owners
as they have a similar device fitted between the top of the engine and
the bulkhead to counteract the engine's tendency to nod forward on its
mountings under braking. On an inline engine such as the Midget's the bar
prevents the engine from leaning over during heavy cornering, acceleration
or braking, all of which twist it on its mountings. Racers use solid engine
mounts but this is really unpleasant for the road. Standard rubber
mounts are fine if relatively new but they soften with age. If your exhaust
starts to bang on the bodywork during hard cornering first change the mounts.
The steady bar is rubber mounted at both ends to stop it transmitting
vibration and runs between a bracket on the top two bellhousing bolts and
a convenient spot on the left hand bodywork. Result: the torque is used
to drive the wheels, not twist the engine.
Gearbox steady bar. Not so much of a problem on the standard
gearbox as the mounting is well designed, although it eventually goes soft
and the three rubber blocks need replacing. The Ford Sierra (Type
9) 'box conversion relies on the tail sitting on a rubber block,
which locates it but does almost nothing to hold it steady. Tuned engines
or cars which see track use can suffer from the back end of the gearbox
being pushed sideways by the torque or G loadings on it. The solution
is to make a steady bar similar in design to the engine one which stops
the rear from twisting about its own axis or moving from side to side.
This helps transmit the power better.
Bookshelf
The following are all recommended
and should be available from specialists.
Technical:
Tuning BLís A-Series
Engine David Vizard Haynes 1985/ numerous reprints
Turbocharging and
Supercharging Alan Allard Patrick Stephens Limited 1982
Workshop Practice
Clive Trickey Speed & Sports Publications Ltd. 1966
Race and Rally Car
Source Book Allan Staniforth Haynes 1986 (revised ed.)
Marque Histories:
Austin Healey Sprite
1958 - 1971 R. M. Clark (ed) Brooklands Books
Original Sprite &
Midget Terry Horler Bay View Books 1994
Spridgets
Chris Harvey Haynes
More Healeys. Frog-eyes,
Sprites and Midgets Geoffrey Healey Gentry 1978
Sprites and Midgets,
The Eric Dymock Motor Racing Publications Ltd. 1981
Sprites and Midgets.
The Complete Story Anders Ditlev Clausager Crowood Press 1991
Competition:
The Works MGs,
Mike Allison & Peter Browning Haynes 2000
Mighty Midgets and
Special Sprites John Baggott Crowood 1998
Spritely Years
John Sprinzel & Tom Coulthard Patrick Stevens/ Haynes 1994
Plus various other hand books
and manuals of varying quality /usefulness for the completist collector.
HOME---EVENTS---GARAGE---L.S.R.---GALLERY---FEATURES---SPARES---LINKS---CONTACT
|